



.dryfta-onsite-hero,.dryfta-onsite-figure,.dryfta-onsite-cta{display:block;margin:0 auto 28px;max-width:100%;width:900px}.dryfta-onsite-hero img,.dryfta-onsite-figure img,.dryfta-onsite-cta img{border-radius:6px;box-sizing:border-box;display:block;height:auto;max-width:100%;object-fit:contain;object-position:center;width:900px}.dryfta-onsite-caption{color:#5f6770;font-size:14px;font-style:italic;line-height:1.5;margin-top:9px;text-align:center}.dryfta-onsite-note{background:#f5f8fb;border-left:4px solid #2f6f9f;font-style:italic;margin:24px 0;padding:16px 18px}.dryfta-onsite-callout{background:#fffbea;border:1px solid #ead77a;margin:24px 0;padding:18px 20px}.dryfta-onsite-table-wrap{margin:22px 0 30px;max-width:100%;overflow-x:auto;-webkit-overflow-scrolling:touch}.dryfta-onsite-table-wrap table{border-collapse:collapse;min-width:820px;width:100%}.dryfta-onsite-table-wrap th,.dryfta-onsite-table-wrap td{border:1px solid #d9d9d9;padding:12px;text-align:left;vertical-align:top}.dryfta-onsite-table-wrap th{background:#f4f6f8}.post-31203 .post-thumbnail img{content:url(“https://dryfta.com/wp-content/uploads/website-content/uploads/2026/09/29061955/onsite-operations.png”);height:auto!important;max-width:100%!important;object-fit:contain!important;width:100%!important}@media(max-width:767px){.dryfta-onsite-hero,.dryfta-onsite-figure,.dryfta-onsite-cta,.dryfta-onsite-hero img,.dryfta-onsite-figure img,.dryfta-onsite-cta img{width:100%}}
At 8:30 a.m., the registration line is moving. Seven minutes later, one badge printer stops. A speaker arrives without the latest slides. A workshop reaches capacity. Then a sponsor asks where its lead scanner is. None of this is unusual. What matters is whether the team spots each problem early, knows who owns the response, and fixes it without creating another one. This is what onsite event operations look like in real time.
Onsite event operations solve this exact problem. They turn months of planning into a clear, workable event day. The job covers more than check-in. It connects people, rooms, schedules, equipment, attendee data, vendors, communication, and contingency plans while the event is live.
This guide gives you a practical way to build that system. It covers the work to complete before doors open, the decisions that matter during the event, and the records worth reviewing once everyone has gone home.
Writer’s note: Good event operations do not prevent every surprise. They make the next sensible action obvious when a surprise occurs.
What are onsite event operations?
Onsite event operations bring together the people, processes, and tools that run an event at its venue. The work starts before the first attendee arrives. It continues through breakdown, reconciliation, and reporting.
The work usually includes:
- Venue access, room setup, signage, and wayfinding;
- Registration lookup, arrival check-in, badge printing, and walk-ins;
- Speaker support, session timing, room capacity, and attendance tracking;
- AV, internet, power, and device readiness;
- Staff, volunteer, vendor, and security coordination;
- Accessibility, attendee questions, and incident response;
- Sponsor support and lead capture;
- Event data, shift notes, closeout, and post-event reporting.
People often use onsite event management to describe the same discipline. In practice, management sets the plan and priorities, while operations carries them out. A strong event needs both.
Start with a command map, not a longer checklist
A checklist tells people what should happen. A command map tells them what to do when it does not.
Before building detailed task lists, name one owner for each live area: venue, registration, program, speakers, AV, sponsors, attendee support, and safety. Give every owner a backup. Then decide who can approve a room change, a replacement rental, a schedule update, or a guest exception.
Keep the escalation path short. A volunteer should not need to message five people to solve a badge problem. Let the registration lead decide, record the exception, and keep the line moving.
| Area | Owner decides | Escalate when | Proof to keep |
|---|---|---|---|
| Registration | Name corrections, badge reprints, standard walk-ins | Staff cannot confirm payment, identity, or access | Check-in status and change log |
| Program | Session timing, speaker support, minor room adjustments | A cancellation or capacity issue affects the published schedule | Final schedule and attendance record |
| AV and IT | Device swaps, cable changes, local troubleshooting | A failure threatens a session, check-in, or event-wide service | Incident, response, and resolution time |
| Attendee support | Directions, accessibility requests, lost items, routine questions | A request involves safety, privacy, or a promised accommodation | Request and confirmed resolution |
| Sponsors and exhibitors | Booth needs, scanning help, delivery coordination | The team cannot deliver a contracted benefit | Issue, owner, and follow-up commitment |
Share the map in one place. Print a copy for the operations desk, then pin a live version in the team leads’ communication channel. Put contact numbers, venue escalation details, and emergency procedures at the top so staff can find them even when Wi-Fi becomes unreliable.
The onsite plan begins weeks before the event
Treat event day as the last rehearsal, never the first test. Work backwards from the moment doors open.
Four weeks out: turn the program into operating requirements
Review the event one room and one audience group at a time. A keynote, poster hall, sponsor exhibition, workshop, and private meeting need different staffing and equipment. For each space, confirm:
- Expected and maximum capacity;
- Seating, staging, signage, and accessibility needs;
- Power, internet, microphones, screens, and adapters;
- Speaker arrival and presentation handoff;
- Entry rules and session check-in method;
- Staff owner and backup;
- The quickest safe response if the room, speaker, or equipment becomes unavailable.
Clean the registration data at this stage too. Resolve obvious duplicate contacts, confirm ticket and role rules, and check whether speakers, sponsors, exhibitors, staff, and attendees have the correct access. Clean data prevents small desk questions from becoming long queues.
One week out: test the real workflow
Test the system by following an attendee, not a feature list. Register a test person. Send the confirmation, find the record at the desk, check the person in, print and reprint the badge, then scan that person into a session. Finally, confirm that the attendance appears in the report.
Include the awkward cases:
- A name with an apostrophe or accent;
- A person who used a different email address;
- A walk-in who needs to pay;
- A badge that needs a job title correction;
- A guest assigned to the wrong ticket type;
- A session that has reached capacity;
- A device that temporarily loses its connection.
Use realistic arrival volume during the test. One successful badge print proves very little. A better rehearsal sends several people to the desk at once while one printer is unavailable and one guest needs help.
The day before: walk the route attendees will take
Begin at the actual entrance. Follow the path to registration, cloakroom, lifts, session rooms, restrooms, quiet spaces, catering, exhibition areas, and exits. Check sightlines as well as sign placement. A sign that looks clear from two metres away may be invisible from the entrance.
Run a complete technical rehearsal with the AV and venue teams. Test microphones from the stage, slides from the presentation device, videos with sound, remote contributors, timers, confidence monitors, recording, and the handoff between sessions. Confirm where the team stores spare equipment and who can approve its use.
Eight workflows that shape the event day
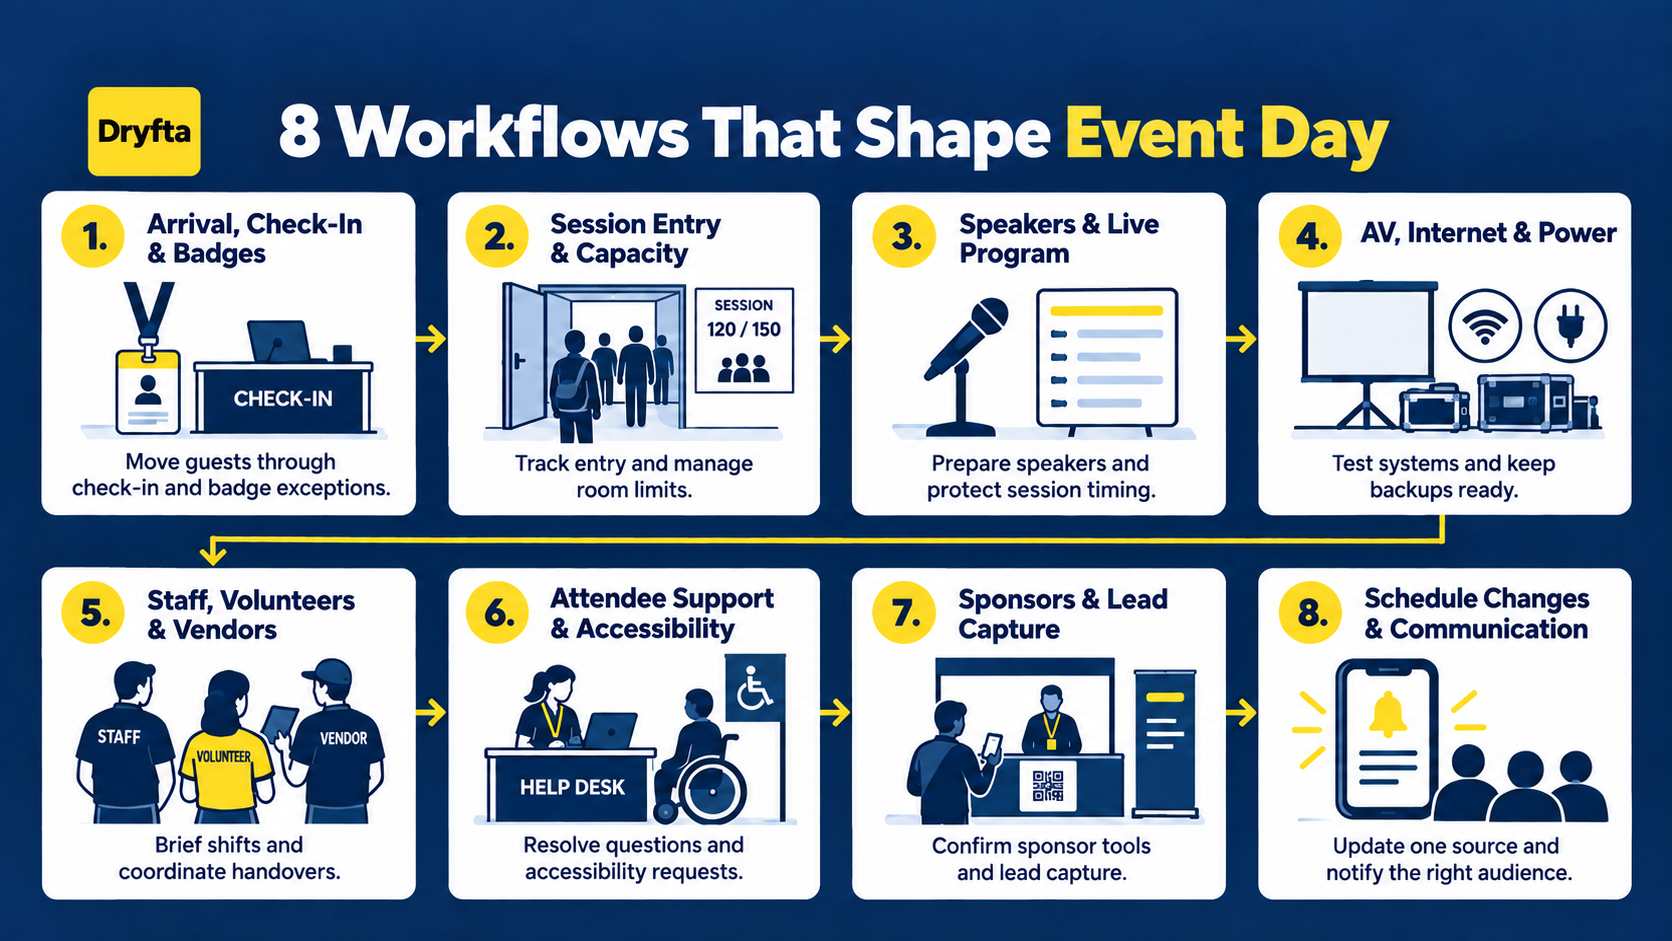
1. Arrival, check-in, and badges
Do not chase a fast average check-in at the expense of everything else. Keep the line moving steadily, give routine arrivals a quick route, and send exceptions to a separate desk. Otherwise, every guest waits while staff handle the hardest case.
Plan the desk around peak arrivals rather than total attendance. Open enough staffed or self-service stations for the busiest period, test scanners and printers together, and keep paper, badge stock, chargers, and spare devices within reach. Decide in advance which details staff may edit and which require a lead.
QR scanning, email lookup, self-service kiosks, and on-demand badge printing can make this workflow faster, but only if they share the same attendee record. If you are still comparing systems, our guide to event check-in apps explains what to test before choosing one.
2. Session entry and room capacity
A popular session can fill in minutes. Give the room lead a clear capacity number and a reliable way to count or scan entries. Decide what happens when the room reaches its limit. You might open a nearby overflow room, repeat the session later, share a recording, or recommend an alternative.
Session-level check-in helps when you need continuing education records, restricted workshop access, actual attendance, or better planning data. Match the method to the event. A quick QR self-check-in may suit an open session, while a staff scan works better when the team must verify access.
3. Speakers and the live program
Give speakers one obvious contact and one obvious place to report. Confirm their arrival, name pronunciation, presentation version, timing, microphone choice, and any access needs. The room lead should know how much schedule movement is acceptable before it affects the next session.
If a speaker is late or cancels, communicate the decision in the same order every time: program lead, room team, digital schedule, signage, and attendees. A fast decision still creates confusion if half the audience sees old information.
4. AV, internet, power, and devices
Technology failures often spread because several workflows depend on the same connection or device. Map those dependencies before the event. If the main network drops, can staff still find registration records and communicate? Can speakers present from local files? Can the team accept payments and capture session attendance for later reconciliation?
Keep tested spares for the equipment that can stop a room: presentation laptop, clicker, adapters, microphone batteries, charging cables, and badge printer supplies. Label them and record who has taken them. A backup hidden in a locked cupboard is not an operational backup.
5. Staff, volunteers, and vendors
Brief people for the decisions they will make, not just the desk they will occupy. Each shift should begin with current changes, common questions, escalation contacts, and a clear finish time. Overlap important handovers so outgoing staff can explain unresolved issues.
Use one channel for urgent operational messages and another for information that can wait. If the team marks every update urgent, leads will miss the one that matters. Give vendors the same reporting structure, along with delivery access, storage rules, service times, and the name of their onsite contact.
6. Attendee support and accessibility
Attendee support works best when it is visible, calm, and able to act. Give the help desk venue maps, the live schedule, transport information, lost property procedures, accessibility notes, and authority to resolve routine questions.
Check step-free routes, seating options, stage access, captioning or interpretation arrangements, quiet areas, and dietary service with the responsible venue contacts. Do not make attendees explain the same need at several desks. Record the request once, share it only with the people who need it, and confirm the resolution.
7. Sponsors, exhibitors, and lead capture
A sponsor package becomes real onsite. Before opening, confirm booth location, power, internet, scanning access, deliveries, speaking commitments, and the person responsible for each promised benefit.
Test lead capture from the exhibitor’s point of view. Scan a badge, add the agreed information, and confirm where the lead appears. Set expectations about consent, exports, and delivery timing. After the event, sponsors value usable records more than a vague assurance that the exhibition felt busy.
8. Schedule changes and attendee communication
Choose a single source of truth for the program. When a room or time changes, update that source first, then the mobile app or website, push notification, digital screens, printed notices, and room teams. Assign one person to confirm that every channel matches.
Keep messages brief and useful. State what changed and when it takes effect. Tell attendees where to go and where to ask for help. When a change affects only one track or ticket group, message that audience instead of everyone.
Handle incidents in the right order
Not every problem deserves the same response. A simple order helps teams think clearly:
- Protect people. Follow the venue’s safety and emergency procedures. Escalate any risk to the appropriate onsite lead immediately.
- Protect the live program. Contain the issue, move the affected workflow if possible, and give attendees a clear next step.
- Protect the record. Note what happened, what changed, who approved it, and what follow-up the team owes.
Use a short incident log rather than relying on chat history. Record the time reported, area, impact, owner, action, time resolved, and any follow-up. This prevents the next shift from reopening a solved issue and gives the post-event review something more reliable than memory.
A useful rule: If a workaround changes access, payment, attendee data, a sponsor promise, or the published program, record it before the end of the shift.
How Dryfta supports connected onsite operations
Onsite work becomes harder when registration, check-in, badges, schedules, communication, and reporting live in separate systems. Staff have to search across tools, updates fall out of sync, and someone must reconcile the records later.
Dryfta keeps these workflows around the same attendee and event data. Teams can use QR codes or kiosks for event and session check-in, print or reprint badges, apply staff permissions, track session attendance, and export records after the event. The mobile event app carries personal schedules and push notifications, so program changes can reach the people affected.
This connected approach is especially useful for universities, associations, nonprofits, and conference teams that manage speakers, submissions, workshops, sponsors, and continuing education alongside registration. It can also be more cost-effective than licensing several separate products and paying staff to move data between them.
Recurring teams do not have to rebuild every edition from the beginning. Dryfta lets organizers copy an event and choose which event data should carry into the new setup. That gives the next event a tested starting point while keeping its registrations and live records distinct.
No platform replaces an operations plan. The advantage is that fewer moving parts need manual reconciliation when the venue is busy and the team needs an accurate answer quickly.
Close the event before you leave the venue
Breakdown is not the end of onsite event management. Before team leads leave, confirm:
- Return or assign every rented device and piece of equipment;
- Give each lost-property item and unresolved attendee case an owner;
- Reconcile walk-in payments and registration exceptions;
- Confirm that attendance, lead, and incident records have synced or exported correctly;
- Tell sponsors and speakers when to expect follow-up;
- Document venue damage, overtime, and extra charges.
Hold a short lead debrief while details are fresh. Ask three questions: What slowed people down? What did the team fix well? What must change before the next event? Save the answers with the operating plan, not in one person’s notebook.
Measure what will improve the next event
Attendance alone cannot tell you whether operations worked. Choose a small set of measures tied to decisions.
| Measure | What it can reveal | Possible next action |
|---|---|---|
| Peak check-in time and wait | Whether desk capacity matched arrival patterns | Change opening time, station count, staffing, or exception handling |
| Badge reprints and corrections | Whether registration data and pre-event checks were accurate | Improve form rules, confirmation emails, or data review |
| Registered versus actual session attendance | Which rooms drew more or fewer people than planned | Adjust capacity, repeat popular sessions, or change scheduling |
| Incidents and resolution time | Where ownership, equipment, or escalation was unclear | Change the command map, training, or backup plan |
| Help-desk questions by type | Which information attendees could not find | Improve signage, pre-event messages, maps, or app content |
| Sponsor scans and delivery issues | Whether sponsor tools and promised benefits worked onsite | Improve onboarding, testing, placement, or follow-up |
Do not collect a metric simply because the system can produce it. Keep the measures that lead to a staffing, layout, communication, or technology decision.
Frequently asked questions
What should an onsite event operations plan include?
Include the run of show, room and staffing plans, owner and backup for each area, registration and badge workflow, speaker process, AV and internet requirements, vendor contacts, accessibility arrangements, communication channels, incident procedures, escalation rules, and closeout tasks. Attach only the documents people will actually use onsite.
How early should onsite event planning begin?
Start as soon as the venue, program shape, and attendee journey are known. For a complex conference, detailed operational planning often begins several weeks or months ahead. The more vendors, rooms, ticket types, speakers, and sessions involved, the earlier you should test the dependencies between them.
How many check-in stations does an event need?
Base the answer on peak arrivals, not total registrations. Time a complete check-in under realistic conditions, estimate how many guests may arrive during the busiest interval, and add capacity for exceptions and equipment downtime. Keep corrections and walk-ins away from the main line where possible.
What is the difference between event check-in and session check-in?
Event check-in records that a person arrived at the venue. Session check-in records attendance at a particular workshop, talk, or activity. Session records can support capacity decisions, continuing education, access rules, feedback, and future program planning.
What should happen if venue Wi-Fi fails?
Use the backup agreed with the venue and technology team. That may include a secondary network, local presentation files, mobile connectivity, offline lookup or capture, and a written reconciliation process. Test the fallback before event day and tell staff which tasks can continue safely.
Is onsite event management software necessary for every event?
No. A small, simple gathering may run well with a clear plan and a few focused tools. Software becomes more valuable when the event has several ticket types, sessions, roles, badge rules, sponsors, or reporting needs. The decision should reflect operational complexity, not just audience size.
Make the event easier to run, not just easier to plan
The best onsite operations are almost invisible to attendees. People find the right entrance, receive the right badge, reach the right room, hear about changes, and get help without seeing the coordination behind it.
That experience comes from clear ownership, realistic testing, useful backups, and connected information. Build those foundations first. Then choose tools that help the team act quickly and leave an accurate record for the next event.
If you want to see how registration, badges, session check-ins, schedules, attendee communication, and reporting can work from one event record, request a tailored Dryfta walkthrough.